node多版本环境管理
python 多版本管理有pyenv,node也有类似的工具nvm
安装nvm
windows:https://github.com/coreybutler/nvm-windows
other:https://github.com/nvm-sh/nvm
安装 node
nvm install x.x.x
这里x.x.x就是你想安装的node的版本
查看所有node版本
nvm list
选择使用哪个node
nvm use x.x.x
python 多版本管理有pyenv,node也有类似的工具nvm
windows:https://github.com/coreybutler/nvm-windows
other:https://github.com/nvm-sh/nvm
nvm install x.x.x
这里x.x.x就是你想安装的node的版本
nvm list
nvm use x.x.x
测试机型:XR
现象:无法卡机,插充电有提示音, 多次按电源键有反馈,但是就是无法开机
参考官方的方案:

1、拔掉电源线,等待10 秒后再插回去
2、等候5 秒后按压HomePod mini 顶部
3、此时顶部的光会由白色转回红色
4、当你听到三次哔声后,即表示重置完成。
注意:如果你使用的是带HDMI的桌面版,一定要选择一个电流足够的适配器,否则会导致异常重启。
sudo passwd root
sudo nano /boot/config.txtdisplay_hdmi_rotate=2sudo systemctl enable ssh
sudo systemctl start ssh系统默认python3,有时候你需要运行的项目是python2的,我们需要pyenv
git clone https://github.com/pyenv/pyenv.git ~/.pyenv
echo 'export PYENV_ROOT="$HOME/.pyenv"' >> ~/.profile
echo 'export PATH="$PYENV_ROOT/libexec:$PATH"' >> ~/.profile
echo 'eval "$(pyenv init --path)"' >> ~/.profile
echo 'eval "$(pyenv init -)"' >> ~/.bashrc
exec $SHELL -l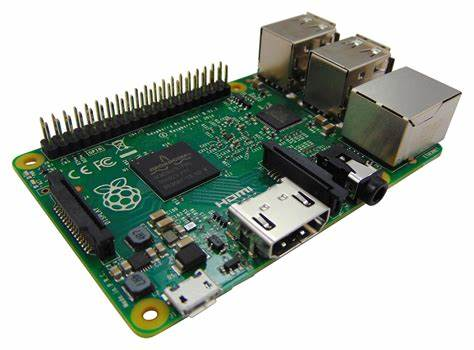
On the other hand, the BCM2835 uses a single core and thread 32-bit microprocessor. Once again, it features a clock speed of 700 Mhz. However, it has a turbo capability to boost clock frequencies up to 1 GHz. Unfortunately, this feature is absent from the BCM2711.The BCM2835 is an SoC that Broadcom Semiconductors developed. As we have briefly mentioned in the introduction, SoC packages such as the BCM2835 make devices such as the Raspberry Pi Zero possible. Additionally, The Raspberry Pi Foundation features the BCM2835 in the Raspberry Pi A, A+, B, B+, and the Raspberry Pi Zero W. Moreover, you can find it in rare models such as the Raspberry Pi Compute Module 1.
Since it’s an older chip package, you’re unlikely to find it in newer microcontrollers or single-board computers. However, its capabilities and peripherals are still worth exploring.准备大于8G的SD
根据前面的介绍,我们知道我们的板子是32架构,所以我们要选择32bit的系统:
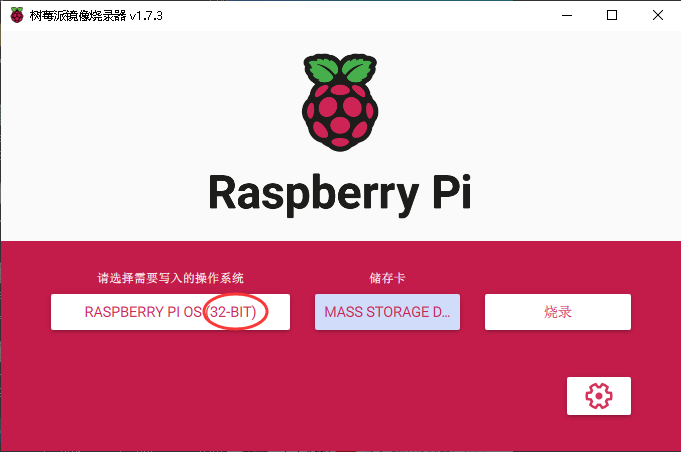
说明:
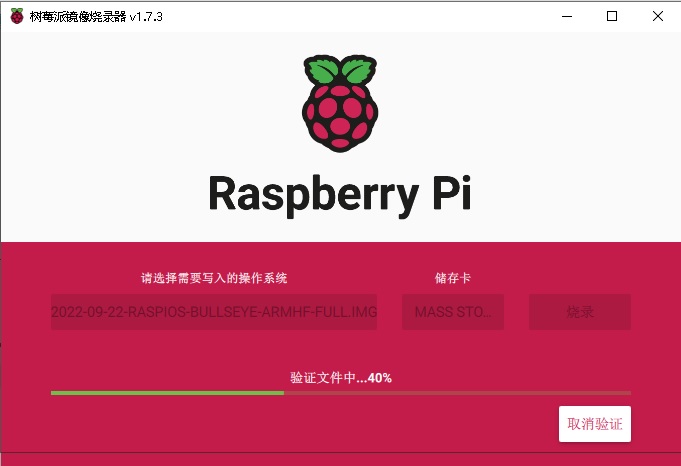
经过耐心的等待,就会提示校验成功,可以拿下sd插入设备了。
关于镜像存储功能简单总结:自动回源,切换无拷贝工作量,且只回源一次,在某些源不稳定的架构中,非常有用。
主要做以下几步:
在对象存储-》空间管理里面,创建一个空间。
加速域名其实就是你想镜像的内容入口。
这里主要就是回源地址,这里非常有用的是支持端口,你懂的,内网资源呵呵呵。
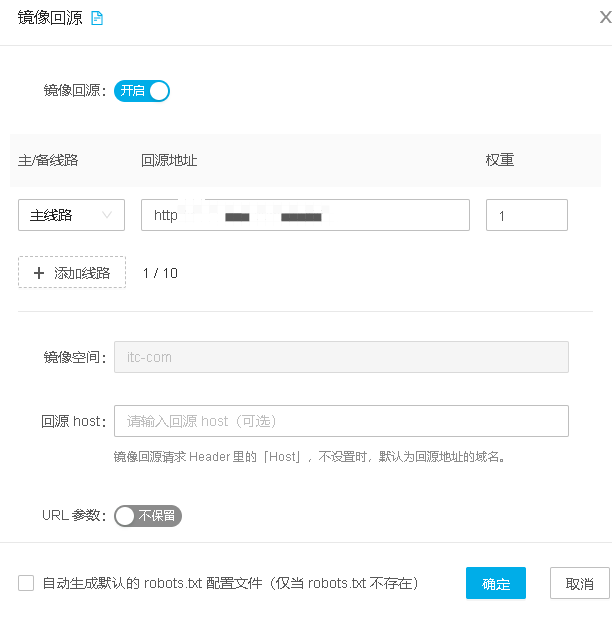
做好以上设置,功能就基本可用了,至于其他高级数据,再按需开启。
最后需要说明的是,镜像服务是一种cdn服务,是收流量费的,在方便和钱之前,还是要实际斟酌调试的。
ldd a.so可以检查a的依赖,但是因为ldd要链接a.so,所以在本机环境正常,但是当是交叉编译的目标时,就不行了。
这时候可以用objdump来检查了:
objdump -x a.so |grep NEEDED
我们知道在ffmpeg已经有了很多lib,比如avcode avdevice avutil等。
如果我们要现有的makefile框架中新增加一个lib叫做a.so,该如何修改?
本文基于ffmpeg4.3.4,如果验证版本有变,请自行调整。
NAME    = a
DESC    = FFmpeg new demo library
HEADERS = a.h version.h
OBJS = a.oFFLIBS := avutil a# this list should be kept in linking order
LIBRARY_LIST="
avdevice
avfilter
swscale
postproc
avformat
avcodec
swresample
avresample
avutil
a
"ALLFFLIBS = avcodec avdevice avfilter avformat avresample avutil postproc swscale swresample a至此,只要a配置正确的makefile就应该能正确编译了。
上面介绍了如何扩展lib,假如ffmpeg原有的lib 叫 x.so, 我们二次开发了一个基于x.so的 a.so, 那么如何让a.so能正确调用到x.so?
configure:
# libraries, in any order
avenc_deps="ava"
说明上面的av是沿用ffmpeg默认命令习惯
TOOLS_DIR=toolchain/bin
./configure --enable-shared \
--disable-static \
--disable-x86asm \
--enable-cross-compile \
--strip=$TOOLS_DIR/llvm-strip \
--extra-cflags="-I$(pwd)/install/include" \
--extra-ldflags="-L$(pwd)/install/libs" \
--prefix=$(pwd)/install \
--target-os=linux \
TOOLS_DIR=ndk-toolchain/bin
./configure --enable-shared \
--disable-static \
--disable-x86asm \
--enable-cross-compile \
--cc=$TOOLS_DIR/armv7a-linux-androideabi26-clang \
--cxx=$TOOLS_DIR/armv7a-linux-androideabi26-clang++ \
--strip=$TOOLS_DIR/llvm-strip \
--extra-cflags="-I$(pwd)/install/include" \
--extra-ldflags="-L$(pwd)/install/libs" \
--arch=arm \
--prefix=$(pwd)/install \
--target-os=android \当我们想定制入网优先级,或者在多漫游网络中想选择较为理想信号强度的时候,就可能用到xPLMNs。
需要说明的是,部分plmn是在sim中的,能不能定制修改,跟开卡的套餐和运营商发卡的限制有关,需要实际测试。
所有的细节都在3GPP的标准中有详细说明,可以自行查阅。

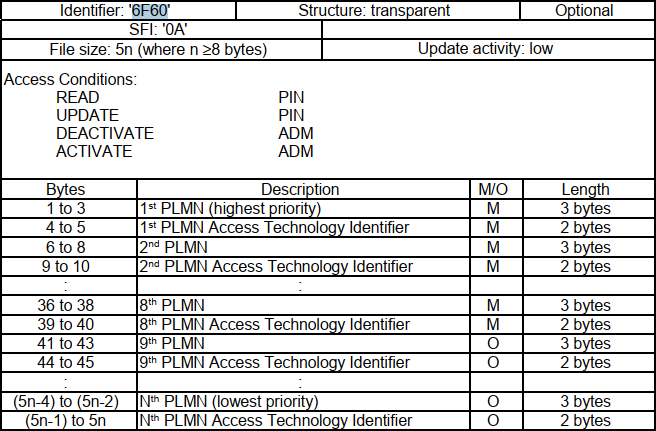

我们经常看到uplmn用户自定义plmn,优先级高于oplmn,参考概述图,我们并没有看到uplmn的说明。
参考以下的内容:
The OPLMN is formally known as the ‘OPLMNwAcT’, and the UPLMN as the ‘PLMNwAcT’. The ‘wAcT’ in each case is short for ‘with Access Technology’所以,uplmn 实际就是 PLMNwAcT=0x6F60=28512
参考ref: